Wordpress Provides us free facility to setup or run the Blog online . wordpress Blog is a website like application Basically it is developed in php . It's totally open source we can also install it on any hosting . It's easy to work no need to know programming we can developed it basely by just like work on ms work or any text editor . I am also using my own Blog "Techtecno2u.blogspot.com" So let's understand how to setup & run the Blog in a local network , It's necessary to us Because now we have to learn how web applications work & how to hack them what are the vulnerabilities in the web applications & how we setup our own Lab to learn about web vulnerabilities
Requirements:
also how to install & unable Apache and MySQL is given on this Page .


Requirements:
- Xampp server ( running Apache and MySQL) you can download it from here
also how to install & unable Apache and MySQL is given on this Page .
- window xp or window 7
- wordpress Application you can download it from here
Follows the steps
Step 1: As i give you the Requirements download and install the xampp server in your window

Step 2 : Now extract wordpress in the Directory C:\xampp\htdocs
and unclick on Show extracted files . and finish it

Step 3 : Go to the directory and see the folder name wordpress .

Here is a file name wp-config-sample.php . I want to explain that this is a file contains Mysql setting , Table prefix , secret keys,wordpress Language, ABSPATH .

First change the name of this file wp-config.php Give name we have to change something in this file .

Step 4 : we need to create new Database in our localhost to do that open the link in your Browser "localhost/phpmyadmin"

here create new Database give name as wordpress and press create Button now it show you confermation message that "Database wordpress has been created"
Step 5 : now open the file wp-config.php with notepad and edit DB_NAME as wordpress ( we can change the Database name at both places here and when we create a new database but we need that the name should be same or if you want any other database give the name and give the user name as root and leave the password Blank

Step 6 : At the end of file we need to change Authentication unique keys and salts.
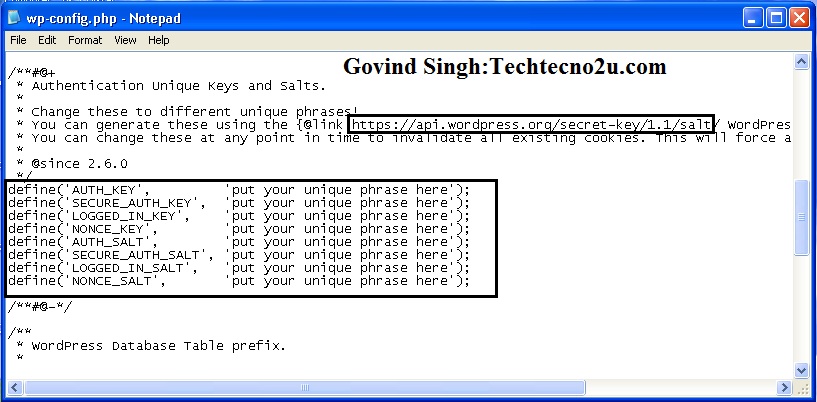
Step 7 : To change these keys go to the address https://api.wordpress.org/secret-key/1.1/salt and

Step 8 : copy the keys and replace them with wp-config.php file key and save the file

Step 9 : Now open your Browser and open the link as "localhost/wordpress/wp-admin/install.php"

fill all the necessary information as in the Image

Now press Install wordpress Button as you press this button it will show you conformation Success !
now you can login to your Blog in the localhost and as you login to your blog it will show you your Dashboard.
Now your Blog in the local host is ready if you want to access this blog in the local network then you need to just give the IP address of the machine where you install your blog running with xampp server and wp-login.php (http://192.168.56.102/wordpress/wp-login.php) (http://localhost/database/wp-login.php)
Enjoy Hacking & Secure Life Friends......
I love this post. It’s so easy to get bogged down in the details of starting a blog that you put it off forever, or worse, are so afraid that you never do it. You just have to start sometime, and there is no such thing as a perfect launch.
ReplyDeleteJoseph Donahue
I’ve been thinking about moving my blog over to WordPress for awhile now. I just haven’t had time to really sit down to figure it out. I still have a full-time job and a full house to juggle, that my blogging has taken a backseat. How hard is it to move all of my content? I want to get a better traffic flow.
ReplyDeleteKelly Hubbard
Jayme Silvestri
ReplyDeleteThis is very helpful information. I wish I had it before I started my blog on Blogger. I had to transfer to WordPress later and that was such a pain! But WordPress is so much easier to use than Blogger. I’m glad I made the change. And I like Blue Host too!